
Guides + Tutorials
A series of tips and tutorials to take better photographs
05/11/17
Four Tips for Fireworks Photography
As 5 November is Fireworks Night here in the UK, I thought that I would put together some tips for taking photographs of fireworks displays.
1: Plan Ahead
As with most types of photography, plan ahead as much as possible. I have found it useful to scout locations prior to the display to help visualise the shots that I want to achieve and to find the best place to set up. Think about the location and how much of it you want to include in your images and give consideration to what will be in the background of the fireworks. Think also about where other spectators will be and if you wish to include any of these in your photographs. When I have identified a good spot, I normally attempt to get there an hour or so before the display begins (depending on the size of the display and the anticipated number of spectators). If in doubt, get there early.
If possible, check the direction of the wind for the night of the display – there are many free online resources which will do this for you. There is nothing worse than setting up for a display and then finding out you are downwind of the fireworks as after the first few fireworks, the sky full of smoke will make your shots quite hazy. Once the display begins, try to take as many shots as you can in the early stages as the amount of smoke in the sky will increase later on.
2: Take the Correct Equipment
My essential equipment for fireworks displays is:
Tripod
Remote shutter release
Zoom lens
Small torch or phone which emits light
The tripod is important as you will need to leave the shutter open long enough to capture the movement of the fireworks in the night sky and this will be much trickier to achieve if you attempt handheld photographs. The actual shutter speed will vary depending on the result want, but I would normally recommend somewhere around 2 seconds to capture a burst or two without overexposing.
Using a remote shutter release enables you to take shots with no risk of camera shake and can result in sharper images. The remote will also allow you to experiment with the shutter speed when your camera is set to ‘bulb’ mode; the shutter will stay open for as long as you hold the release so you can judge how many fireworks you can capture in one shot. I normally watch the sky during the display and press down the remote release as each firework begins its ascent into the sky and keep pressing until the explosion has faded away. Sometimes it is possible to capture multiple bursts in one shot (perhaps aided by covering the lens with a black card in between bursts) but I have found that single bursts can make very interesting photographs. I would recommend playing around with the setting to find what works for you – and for this reason, a small torch can come in useful. I have made use of my phone to provide light to check camera settings, but this drains the battery quite quickly so a small torch is better.
I normally use a zoom lens (Canon 24-105mm f/4L) when shooting at fireworks displays. This gives you scope to set up some wider angle shots to incorporate more of the environment in your photographs and also allows you to zoom in closer to the action, resulting in more detailed explosions against the night sky. If you are feeling experimental, I would recommend zooming in on the fireworks whilst the shutter is open; the results are often mixed but you can get some pretty interesting photographs with this zoom effect.
3: Set to Manual Mode
Don’t be afraid to play around with the settings until you get the results you are happy with. I have found that shooting at fireworks displays tends to involve a fair bit of trial and error. However, I do recommend setting your camera to manual mode so that you control each aspect of exposure. The size of the aperture has an effect on the light trails in each burst of fireworks. I tend to shoot with a medium to small aperture; from f/8 to f/16. I find that shooting at f/8 results in clear light trails in the sky with enough of the background in focus. As the aperture gets smaller, the light trails tend to get a bit thinner and can slightly lose impact in the final image so I would recommend experimenting with mid to small apertures until you are happy.
I would also advise a low ISO to keep your images free from noise – ISO100 always has worked for me. I have always used auto white balance for fireworks as this setting has always produced vibrant and realistic colours for me. I also recommend shooting in RAW as this will allow you to make changes to the white balance in post processing if necessary.
As the camera’s autofocus sometimes struggles with fireworks, particularly when the sky has become hazy from smoke, I would advise focusing prior to the display and then switching from autofocus to manual focus. You would then only need to change focus if you wanted to change the angle of the camera or if you wanted a different shot of the display, for example, including some of the spectators in your final image.
4: Have Fun
Fireworks displays can be fun and it is easy to forget this when watching them solely through the viewfinder. Using a remote shutter release will make it easier for you to enjoy the display and judge when to open the shutter to capture the best fireworks moments of the evening.


01/10/17
Four Ideas for ‘Rainy Day’ Photography
Do you get fed up when it is too wet or miserable outside to go out and take photographs? I certainly do. So, because winters here in the UK can drag on and on, I have come up with several projects to test my photography skills without needing to leave the comfort of my house and which do not involve a lot of specialist equipment. Why not give one of them a go whenever you get a rainy photography day?

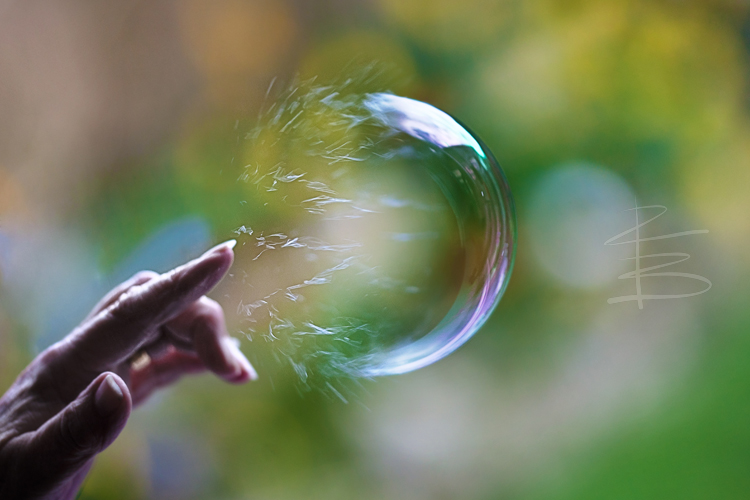
1. Burst My Bubble
Equipment needed: Kid's bubble mixture (Washing Up Liquid can be used as an alternative)
We had some kids bubble mix left over from the summer holidays and so I thought that I would attempt to take a picture of a bubble bursting. I set my camera to a high shutter speed and a wide aperture and got a friend to blow bubbles in the kitchen. I positioned them in front of the window to get a nicer background. I then manually focused on the bubbles and attempted to release the shutter as my friend popped them with a finger. I will be honest - it took a lot of attempts to get the exact timing right, but I think the end results are worth the effort. The shape of the bubble in mid-burst reminded me of a jellyfish. Why not give it a go - it doesn't cost very much and just takes a bit of trial and error.

2. Paper Rainbows
Equipment needed: Colour paper (various colours)
I used some origami squares of paper which I had previously purchased for about £1. They are small squares and come in a range of colours. I took one sheet of each colour, folded in half and placed them in the order of the colours of the rainbow. With the fold at the top, I pinched all of the sheets together and held at one end with a bulldog clip. I then used my macro lens (Sigma 150/f.2.8) to get as close to the folds of paper as possible. I used as wide an aperture as I could (f/2.8) and positioned my camera along the top of the folds, focusing on a point around the middle of the papers. With such a wide aperture, most of the final shot is nicely blurred out resulting in some great effects - the colours seem to merge together. Play around with the camera angle and the position of the folded papers to get a wide range of creative effects.


3. Oil on Water
Equipment: One glass with a clear bottom; Olive Oil or Vegetable Oil; Water; Patterned Paper (I used some old wrapping paper)
Adding oil to water can create some great bubble-like effects as it forms a film over the surface of the water. These can make great macro photographs. Just add a small amount of olive oil (or cooking oil) to a glass of water and leave the mixture to settle for a few minutes. I use a tripod to keep the camera steady and set this up directly above the glass. I also use a remote shutter release to eliminate camera shake. I normally set the camera at a medium to small aperture - anything around f/8 normally produces sharp images. I keep the ISO low and have quite a fast shutter speed as, whilst the liquid is mainly still there is some chance of movement.
Get as close to the liquid as you can for best results and focus manually - using the live view is useful due to the angle of the camera. The paper or card underneath the glass is what creates the colour so why not play around with different backdrops to get different colour 'bubbles'. I used some old wrapping paper and the results are shown here.


4. Household Object Macro
Equipment: Macro Lens or converter; any household object
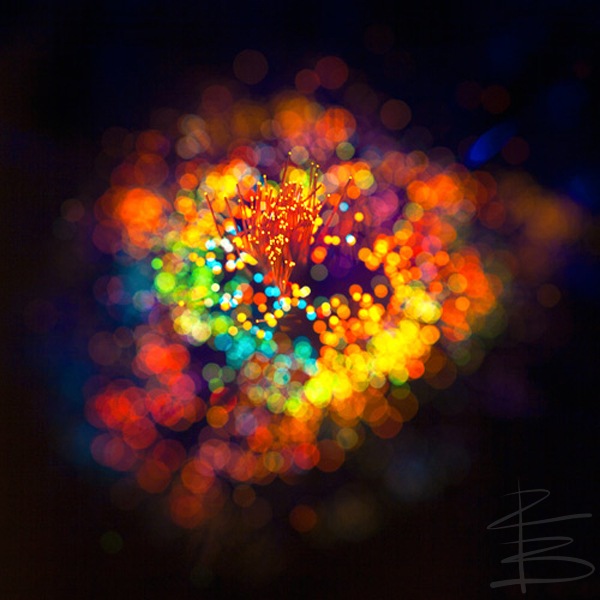
I take many macro shots outdoors, normally of insects or plants, but I do not often take macro shots around the house. So, on a recent rainy day, I decided to put the macro lens on my camera and find a new or interesting angle on various objects around the house. My first subject was my grandfather's pocketwatch. Opening the back of the watch to see the mechanisms inside was fascinating and made for some good close-up shots. I then set up a glass chess set and used my flashgun to light the pieces and a wide aperture to create some bokeh. An old fibre optic Christmas Tree made an excellent subject for some rather abstract macro shots. I turned the colours on and they cycled through the spectrum as I positioned my camera directly above the top of the tree. I looked straight down onto the tree and focused on the very top, using a wide aperture to blur out the lower portions of the tree. My results are shown below. Finally, I laid a pair of reading glasses on an open book and focused on the lens, which magnified the text behind it. On the next rainy day, why not look around the house and try out some close-up shots to find a new angle on an everyday object.


01/09/2017
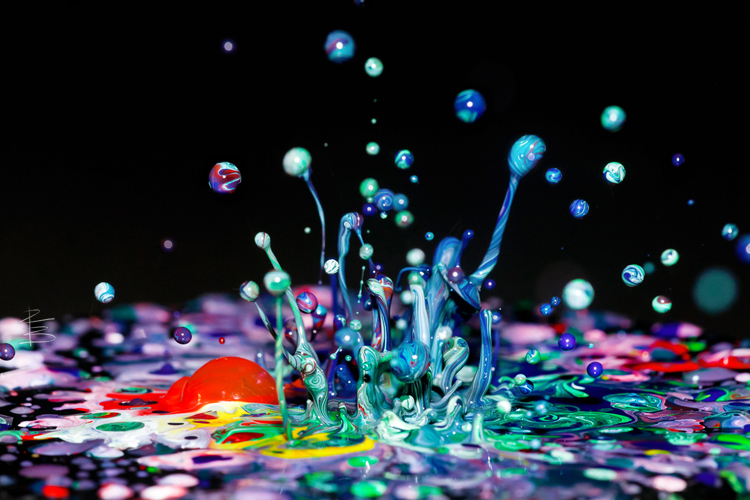
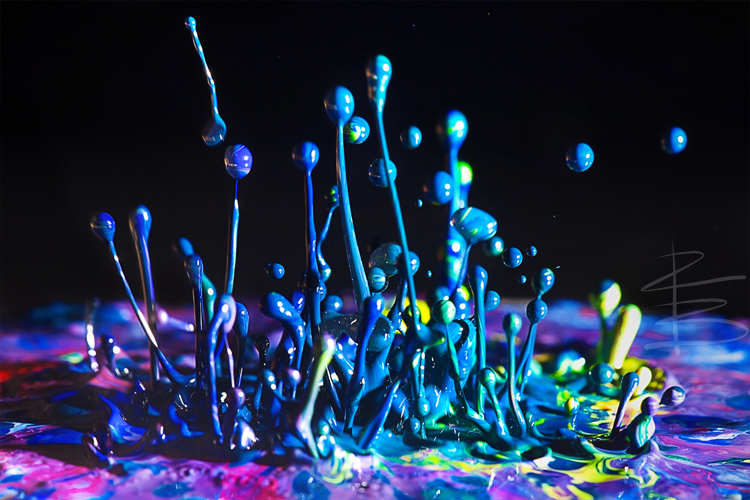
How to Photograph Paint Dancing to Music
My eyetunes series has proven to be popular over the past year and quite a few people have asked me via my website or on Flickr how I took them.
So, here is a brief guide to taking photographs of paint dancing to music.
Equipment
I have taken all of my eyetunes series using the following equipment:
Speaker with the outer casing removed
ipod
Uninflated balloon (black or white balloons are best)
Paint (the runnier the paint the better, but you can thin down with water)
Tripod
Canon 5D Mark II
Sigma 150/f2.8 Macro Lens
Canon 580EXII Speedlite Flashgun (x2) synched to use off camera
Black background
Music collection


Process
Made famous by Martin Klimas in his ‘What Music Looks Like’ project, the process of bouncing paint in time to music excited me as soon as I saw it in a photography magazine as it combined my two passions of photography and music. I set out to replicate the process using what I had available to me at the time and it took me a lot of attempts before I got anything that I was remotely pleased with. My advice, don’t give up. It’s a fun process to try and you can get good results if you keep trying.
Once you have a speaker that can play from an ipod (other music devices are available) and that you are prepared to dismantle and get covered in paint, you need to stretch an uninflated balloon over its surface. Cut slightly into the thin end of the balloon with scissors to help with this tricky stage of the process. I use black balloons as they go with my overall look and feel to the photographs – black, reflective surface and black background.
Focus manually on the centre of the now balloon-covered speaker and then switch from autofocus to manual. I advise an aperture somewhere in the medium to small aperture range; around f/9 or smaller to ensure as much as possible of the drops of paint are in focus. You will need to play around with the settings until you get the results you are trying to achieve. With the camera on a tripod and focused on the centre of the speaker, connect the flashguns (or off-camera lighting) to either side so that the paint is lit and the black background is not.
To capture the high-speed movement of the paint, I opted to set up in the dark so that the light emitted from the flashguns controls the speed rather than the shutter speed of the camera. I advise setting the flashgun to manual mode to control the strength and duration of the flash and setting the ‘shutter sync’ mode to ‘high-speed’. Take a few test shots to make sure you have your exposure settings how you want them - I would recommend trying the process with water or milk at first so that you do not waste paint.
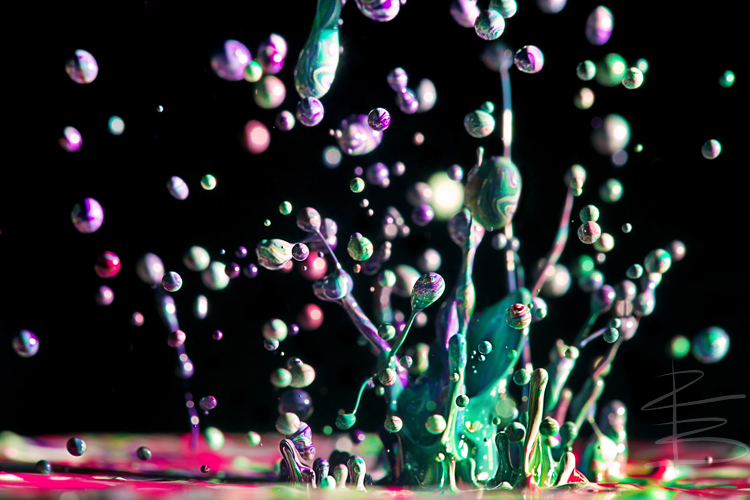
Now you are ready to turn on the speaker and ipod and start capturing dancing paint. I find that the speaker size does not make too much difference. You can get the paint to bounce to the vibrations when the volume and bass are increased. Different frequencies have different effects; some send the paint flying everywhere in small drops whilst others produce more controlled shapes. All I would suggest is experimenting with a range of sounds and paint combinations.
Personally, I decided to use a different song for each attempt so that the final photograph represented that particular song. Once you have found the settings that work for you, the process becomes more straightforward and you can start having some fun with it. Why not use your favourite song and see what results you can get. You could vary your choice of colours for each song or very the amount of paint you put on the speaker to get quite different results.
I opted for a slightly ‘messier’ look by not clearing up paint from the speaker used in previous attempts as I found this added to the vibrancy and interest of the final result. It is a matter of personal taste really, but I wanted my photographs to convey the excitement of listening to the music so possibly I used more paint than is required with the ipod set to maximum volume. This project was all about fun, so pick some good tunes and just go for it.
09/04/17
Using the Stroboscopic Effect in Your Photography - ‘Schrödinger’s Egg’
Taking my inspiration from a famous experiment by Austrian physicist Erwin Schrödinger (where a cat could be said, philosophically, to be dead and alive at the same time) and because it's the Easter holidays, I thought that I would create an image that simultaneously showed an egg in one piece and shattered into bits. To create this image totally in-camera, I decided to use the stroboscopic effect by using my flashgun.
I've experimented with the stroboscopic effect before by firing multiple flashes in quick succession to capture items in motion (some of my other shots can be seen below). I really like this effect as it allows us to see something that the human eye/brain alone would never be able to register - which reminds me of why I got into photography in the first place.
Process
For this shot, I waited for it to go dark, placed an egg on top of an empty bottle and fixed my camera in place on a tripod. I manually focused on the egg by shining a torch on it and switched off autofocus. I set the camera to manual mode and an exposure time of 2 seconds at f/8 and triggered with a remote shutter release.
The torch was switched off so that the only light in the exposure would be from the flashgun, enabling me to capture the motion. A friend of mine had previously aimed an air gun at the egg (whilst the torch was on) and he pulled the trigger as I triggered the shutter/flashgun. I had set the flashgun to ‘multi’ mode and had set it to fire 5 flashes in quick succession.
There was some trial and error in getting the timing right with the air gun, but after about 3 eggs, I managed to get the shot that I was happy with. I varied the number and duration of the flashes to experiment with the effect.
Post-processing
I took the shots in RAW so that I could make a few basic amendments (curves, sharpening) but other than those basic tweaks, no other photoshop editing was necessary.
Some of my other explorations into the stroboscopic effect are shown here.


25/03/14
Stroboscopic Effect – How to capture motion in a single photograph
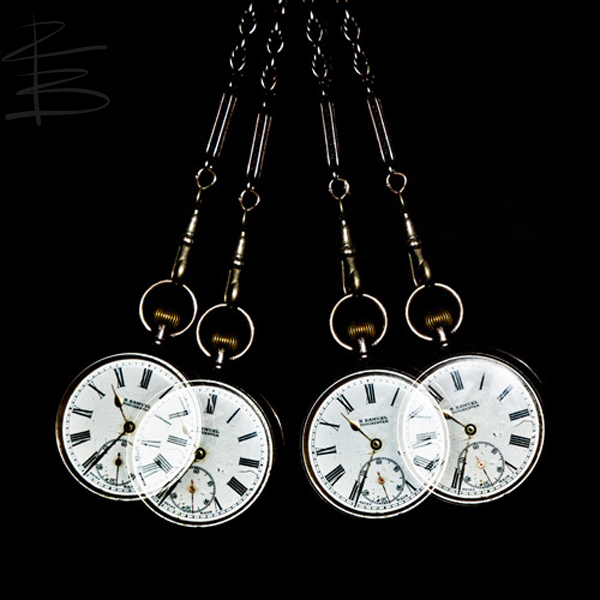
Since I bought a Canon 580EXII Speedlite flashgun a couple of years ago, I have been fascinated by the ‘multi’ setting and decided to see how I could incorporate it into my photography. I read up on its use and learned about the stroboscopic effect. This is a visual phenomenon in which the human eye sees a number of sequential still images and the brain ‘stitches them together’ to create a moving sequence. The effect is the basis of motion-picture cameras which conventionally film at 24 frames-per-second.
The ‘multi’ mode on the flashgun allows you to fire multiple flashes in quick succession which results in multiple exposures in a single shot. I began thinking of an appropriate motion to capture in-camera and came up with the idea of a swinging pocketwatch. This image is often associated with hypnosis in TV and films and so I thought capturing the movement of the watch by using the stroboscopic effect would allow me to tell a story through the movement – seeking to put my viewers into a hypnotic trance!
The main image shown here was created wholly in-camera with no post-processing other than a bit of contrast adjustment and sharpening. The process was as follows:
The camera was set up on a tripod in front of a black background. The flashgun was attached to the camera.
A friend held the pocketwatch in front of the background and began swinging back and forth in a gentle motion. I timed how long it took for the watch to complete its trajectory a couple of times and, from these timings, calculated the flashgun settings.
The shutter speed of the camera was set to 2 seconds to allow time for it to swing through a couple of complete arcs. The flashgun was set to ‘multi’ mode and was set to fire 4 flashes over the 2-second exposure.
I manually focused the camera on the watch and turned off the camera’s autofocus setting. With the watch beginning its trajectory, I released the shutter.
The process took a few attempts to perfect and the timing of the swing was quite tricky to get right. However, I soon got the shot that I was happy with as I really liked the movement that I had captured.
Following my experiment with the hypnotic swinging of a pocketwatch, I began to think of other types of movement that I could capture. Using the same principles of the stroboscopic effect, I managed to capture a creepy Halloween-inspired shot of a Scream mask creepily ‘moving’ from side-to-side as well as capturing the arc of a bouncing ball and the toppling effect of dominoes.
I would recommend trying out the ‘multi’ setting on your flashgun if its available as this technique is a lot of fun and really does allow you to tell a story through photography by showing something that the human eye cannot see.


